Cervical Screening Management System
Cervical Screening
Getting ready for the new NHS Cervical Screening Management System
The NHS is introducing a new NHS Cervical Screening Management System which will replace the current call/recall IT system for cervical screening (Open Exeter) that sits on the National Health Application and Infrastructure Services (NHAIS) platform.
All staff involved in the delivery of Cervical Screening Services in England must have an NHS smartcard (and a smartcard reader) ready to access the new system. All smartcards must have the correct roles and cervical screening workgroup applied by the Practice Manage to use the new system.
Three Key Actions
Update 06/03/24: Check Access / Complete Training
Update 01/05/24: Check email address
There are now key actions that all users of of Open Exeter for Cervical Screening must complete:
- Check your access - carry out a check to confirm if you can access CSMS.
The access check will not enable you to use CSMS yet, it is to check you have the right permissions to access it when it does go live. You can check your access here. Please see below for further instructions, or see this NHSE guidance. - Complete training – there are two CSMS modules that must be completed.
The two modules are now live on the Learning Hub (you can use your e-Learning for Health login to access).
Part 1 Introducing the new CSMS
Part 2 Using the new CSMS
Training must be completed before using the new CSMS. For more information please visit the website. - Check email address - check for valid generic email address in system
Practices are asked to check the email address held on Open Exeter, by visiting the Organisation Maintenance Screen on the main menu Application drop down list, so that they continue to receive emails advising that the PNL is available for completion from the Cervical Screening Administration Service (CSAS).
A generic email address, rather than a named individual’s email, should be used to avoid notifications being missed.
If required, the practice’s Primary Contact/Primary User on Open Exeter must email pcse.openexeter@nhs.net requesting that the email address for cervical screening PNLs is updated. Please include the practice code/ODS code in the request.
Please action this request by 7th June 2024 to ensure that, when CSMS goes live, PNL reminders continue to be issued and received to support effective call and recall of patients.
Practice Managers / Administrators
Please follow the guidance below to check you have access to Workgroup Management Assignment (WGMA). If you do not have access then complete a smart form link below requesting you are given access to WGMA and the names and 12 digit smartcard numbers of any additional users you need to give access to.
https://itservices.midlandsandlancashirecsu.nhs.uk/forms/smart-card-ra-form/
Cervical Screening Work Group Adding and Removing individual user
The new NHS Cervical Screening Management System (CSMS) will replace the National Cervical Screening call/recall system NHAIS which is accessed via Open Exeter.
As Open Exeter will no longer be accessible after the transition to the new NHS CSMS, it is vital that Registration Authorities and system users take action to enable a seamless switchover.
This guide will assist in the adding and removal of individual users to the Cervical Screening Work Group (CSWG)
Objective: is to add and remove individual user to you practice Cervical Screening Workgroup.
Please note you must have a Practice Manager position on your smartcard for the organisation you are working for.
Cervical Screening Rights Checks
1. Log into Care Identity Service (Where you normally manage smartcards)
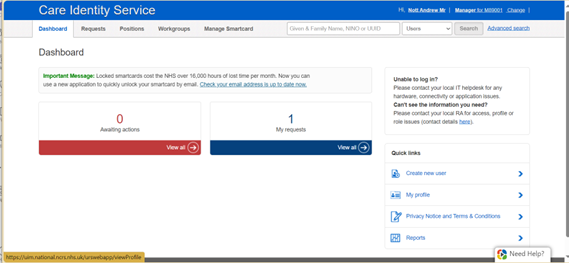
2. Go to the workgroup tab right mouse click on tab.
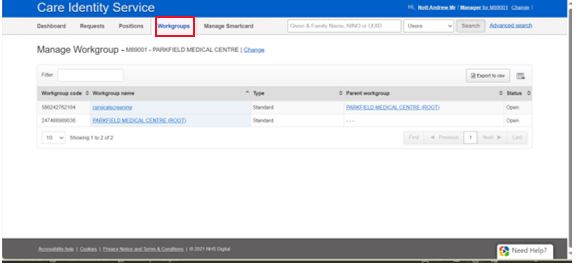
3. Check that the Cervical Screening work group has been created, if you cannot see the cervical screening work group, please complete a smart form link below and ask for one to be created, before you can go any further.
Smart Card / RA form - Commissioning Support Unit (midlandsandlancashirecsu.nhs.uk)
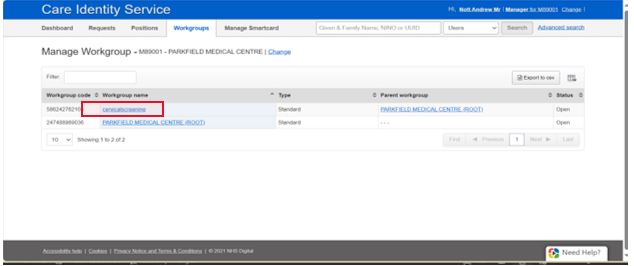
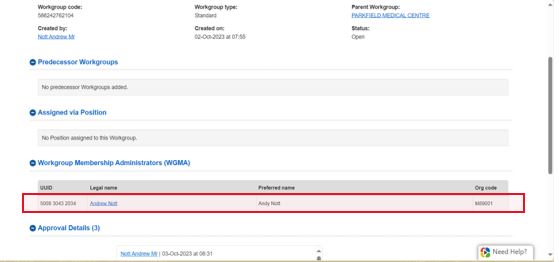
4. Click on cervicalscreening in blue (last slide) and you should see the Workgroup Membership Administrators (WGMA) user that have rights to assign cervical screening to staff members if you are not in this group and you are the practice manager, please complete a smart form asking to be added as a WGMA administrator. If you are in the group move to next stage.
Adding Individual Users to Cervical Screening work group
1. On the tab bar type in the 12digit smartcard number (this can be found on the front of the smartcard) Click Search.
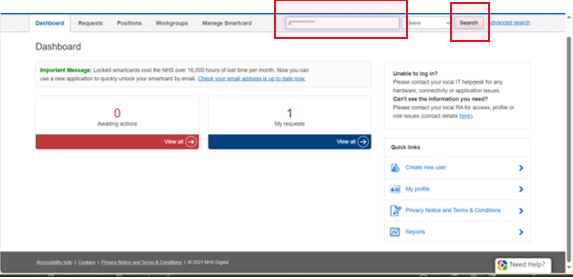
2. Click on smartcard number in UUID field in blue.
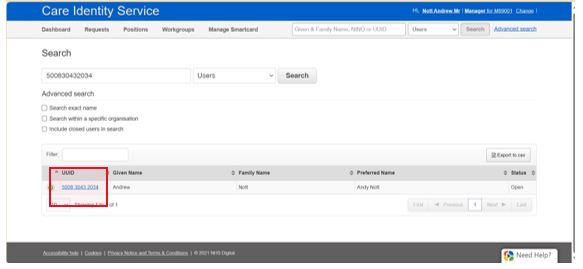
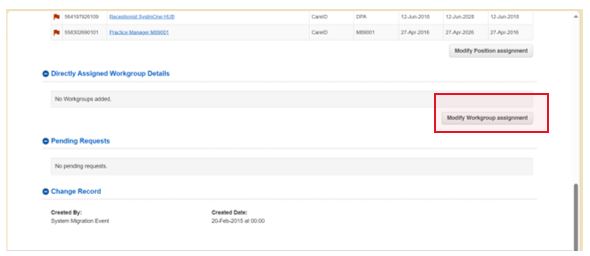
3. You should see users profile details go to Directly Assigned Workgroup Details.
4. Click on Modify Workgroup Assignment (Right hand side of page).
5. Click Add Workgroup.
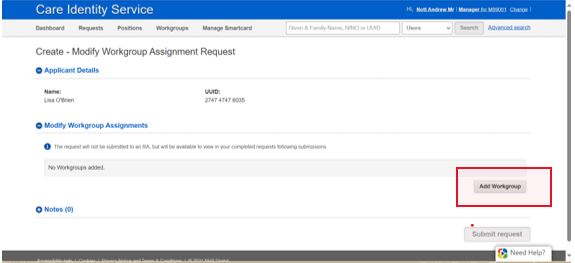
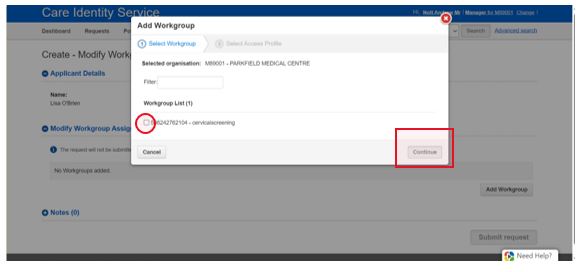
6. You should see the page above tick the box at the side of Cervicalscreening, not the root workgroup if it appears, click continue.
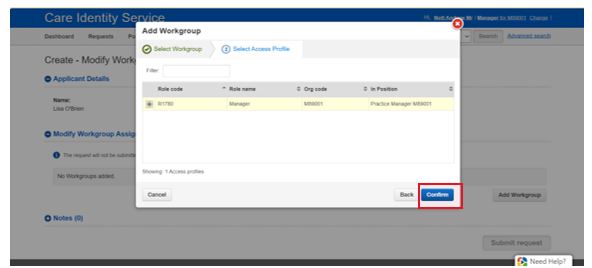
7. Select the Access Profile possibly Practice Nurse or Administrator, but it may have a slightly different title. click continue.
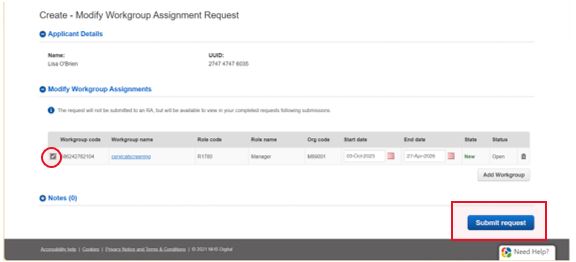
8. Tick the box at side do not change the start date or end date. Submit request.
9. You have completed adding workgroup to individual user.
Remove User from Cervical Screening Workgroup
Note: You may remove Cervical Screening workgroup from user you do not want to have access anymore or if they are leaving.
1. Follow steps above to search for user.
2. When you have found user go to Modify Workgroup Assignment
3. Click on trash can at end of workgroup details.
4. Click Submit
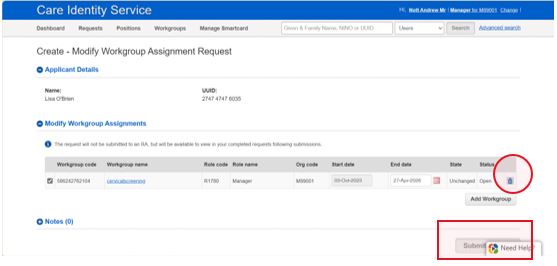
5. You will be prompted are you sure you want to remove cervical screening workgroup.
6. Click on confirm.
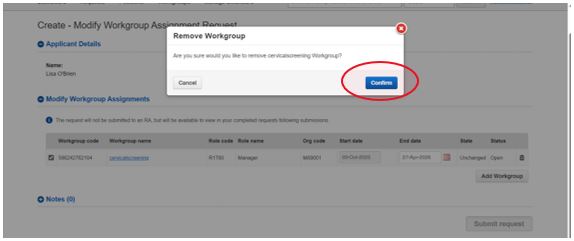
7. View users details again, and the workgroup should have been removed from the users.
Adding a Bookmark / Favourite
Need to add the shortcut to your bookmarks or favourites so that you access it quickly and easily?
Here are the instructions for adding a URL as a favourite or bookmark in both Google Chrome and Microsoft Edge.
For Google Chrome:
- Open Google Chrome: Start by opening the Google Chrome browser on your computer.
- Visit the Website: Type cervicalscreening.nhs.uk into the address bar and press Enter to navigate to the site (or click the link in this guide).
- Bookmark the Page:
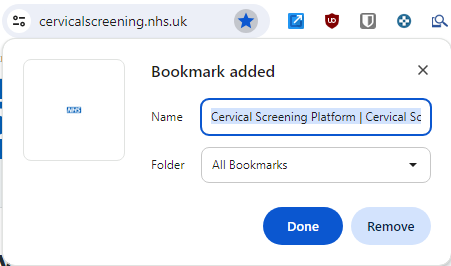
- Click on the star icon located at the right end of the address bar.
- A pop-up will appear. You can name the bookmark and choose where to save it (e.g., in the bookmarks bar or another folder).
- Click "Done" to save the bookmark.
For Microsoft Edge:
- Open Microsoft Edge: Launch the Microsoft Edge browser on your computer.
- Visit the Website: Enter cervicalscreening.nhs.uk into the address bar and press Enter to go to the site (or click the link in this guide).
- Add to Favourites:
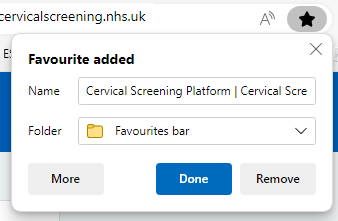
- Click on the star icon with a plus sign (Add to favourites) found on the right side of the address bar.
- A dialogue box will appear. You can edit the name of the favourite and select the folder where you want to save it.
- Click "Done" to save the favourite.
These steps should help you quickly add cervicalscreening.nhs.uk to your favourites or bookmarks in both browsers.
Adding a shortcut to your desktop
Alternatively / additionally, if you want to add a shortcut to your desktop, you can simply:
-
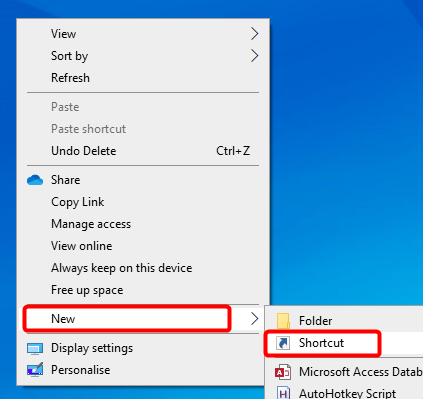
- Right-click on an empty space on your desktop.
- Select New > Shortcut from the context menu.
- In the "Type the location of the item" field, type https://cervicalscreening.nhs.uk and click Next.
- Enter a name for your shortcut (e.g., "Cervical Screening NHS") and click Finish.
Further Information
For more information, please check the national website:
New NHS Cervical Screening Management System - NHS Digital
Or email the national team:
