EMIS Web - Admin Appointment Book Quick Guide
2. For ease of use add Appointment Book icon to the Quick Access Toolbar. Using the drop-down arrow (to right of toolbar), select Customise, highlight Appointment Book and click Add and click OK.
3. Click on Appts Config icon on the ribbon to ensure the configuration settings are correct.
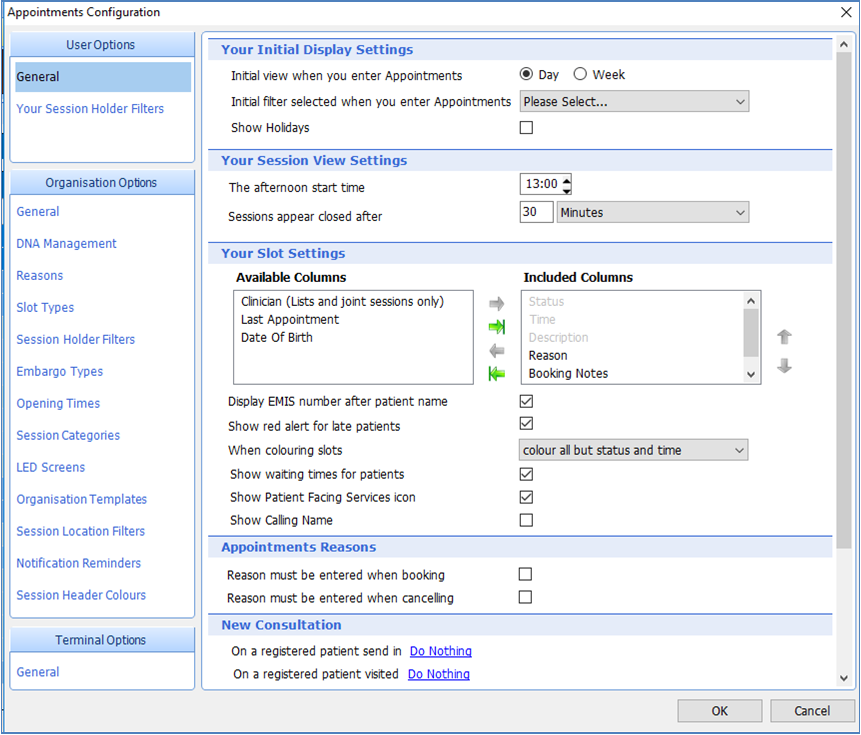
4. Enter a suitable amount of time in the Sessions appear closed after. This option allows the session to remain open even if the Clinic is over-running.
5. Select Booking Notes from the Available Columns and using the right green arrow add it to the Included Columns and sort the column order by using the Up and Down arrows.
6. Date Of Birth column could also be useful to identify Patients with the same name (optional).
7. Tick Display EMIS number after patient name. This helps to identify the Patient from an unregistered Patient.
User Options— Your Session Holder Filters
8. Highlight all the required Available Filters (Using shift key to select all) and move across using the appropriate green arrow to the Chosen Filters area. Use the green Up and Down arrows to order the list as appropriate.
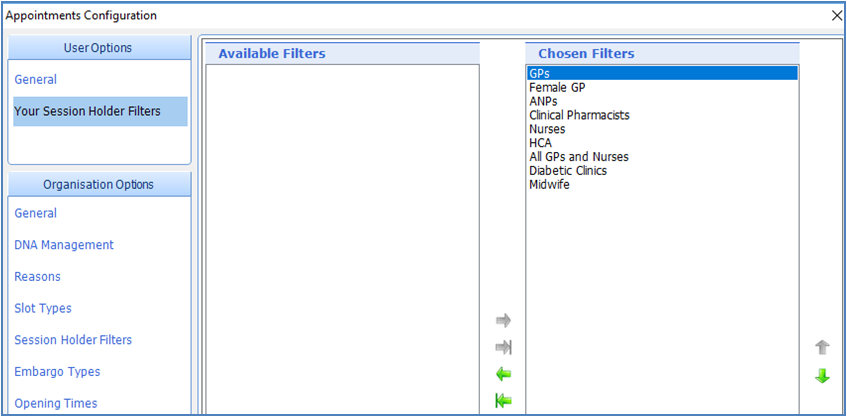
9. Click OK to save the settings. The selected Session Holder Filters will now become visible from the Appointment Book screen.
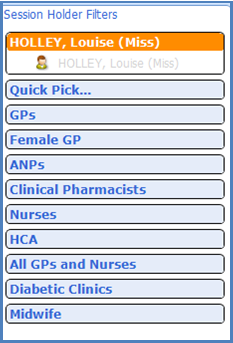
10. Click on a Session Holder Filter to access a session for the specified date.
Note: Select the required date on the calendar by either clicking on the actual date, using the green arrows to move to the required date or using the number lock +plus sign to enter for example (2w, then hit return key): to look 2 weeks ahead.
11. The screen shot below shows an example of an individual Clinician’s morning session.
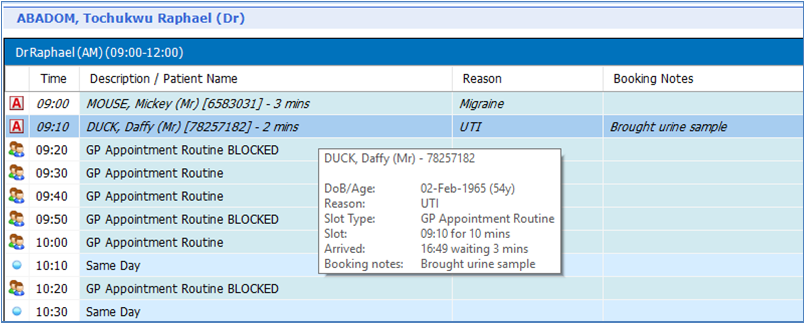
12. The Patient’s Name/Reason/Booking Notes/Waiting time are visible from the columns. Position the cursor over the Patient's name (i.e. hover) to see more related information.
Appointment Book - Book Appointment
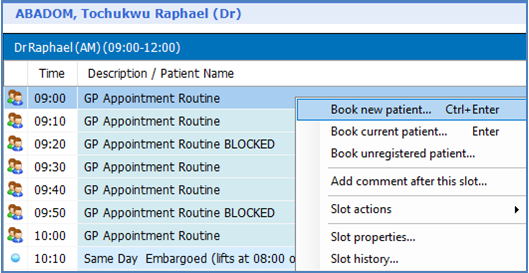
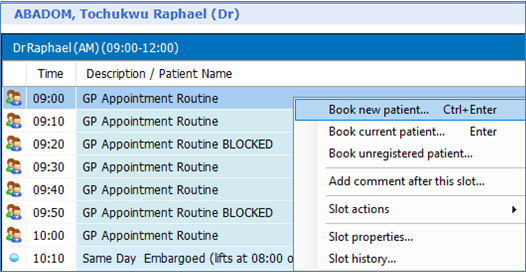
13. Right click on the required Clinic appointment slot and select Book new patient or select Book current patient if the Patient is already active on the Precis Bar.
14. If choosing Book new patient, search for and highlight the Patient in the Patient Find screen and click OK.
15. The Book Slot screen will appear.

Note: The appointment details will appear at the top of the Book Slot screen. Free text can be entered in the Reason or Booking Notes fields. If free text is entered in the Reason field the time will default to the session time, unless a timed reason is selected from the drop-down list. Always keep free text Reasons clinical as these can be viewed by the Patient within Patient Access!
16. The Reason field holds all the timed Reasons for Nurses/HCA activity etc. It is recommended that the Practice includes a Reason of GP Double-Appointment (20 Mins) for when Patients require this. It also saves staff having to highlight 2 appointments on the Appointment Book before booking. Please select or enter the appropriate Reason.
Note: Slot types can be changed at this point i.e. from a Face-to-Face to a Telephone Consultation if required.
17. Otherwise if none of the above are required, confirm the booking details with the Patient and then click Book.
Note: The Patient is now booked into the required slot.
Cancel an Appointment
18. Highlight the Patient's appointment on the clinic slot and press C on the keyboard to Cancel. If required select/enter a Reason, click Cancel Appointment and then click Close.
Add Comment
19. To add a Comment to the appointment session/slot, either Patient related/non-Patient related, right click where the Comment is required to be viewed and select Add Comment after this slot (as previous screen shot shows in point 13.)
20. Type the Comment and click OK: A yellow banner will appear surrounding the Comment.

21. Right click to Edit/Delete the Comment if required.
Arrive a Patient
22. Highlight the Patient and press A on the keyboard to Arrive the Patient.

23. To clear the arrival (if made in error) press C on the keyboard to cancel the previous stage and return the Patient to un-arrived.
24. If the Patient arrives and then leaves due to being unable to wait any longer, press W on the keyboard for Walked out.
Note: The Clinicians will press S for Send in on the keyboard once the Patient is ready to be seen (consulted).
Slot Status Information
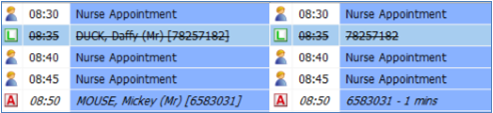
25. A red exclamation mark denotes the patient is late: ! The moment that the arrival time has been exceeded a D will then appear denoting the Patient as Did not attend (DNA). This DNA is an automatic system timed function (within Appointment Config) which is also recorded/coded in the Patient’s Care History. In the rare occasion of a Clinician still being able to see a Patient that has DNA'd and then presented late, highlight the Patient and press C on the keyboard to clear the DNA status. This action enables the A on the keyboard to be pressed to record the late arrival.
26. If staff have been informed that the Patient is unable to attend the appointment just prior to the scheduled arrival time and do not want the system generated DNA to be recorded unfairly i.e. (DNA - No reason), highlight the Patient and press D on the keyboard to choose the option of DNA - Reason given.
Note: Once a Patient's consultation has been saved by the Clinician, the system will automatically record the Patient as L for Left.

Appointment Privacy
27. From the Appointment Book staff may choose to click the Privacy button on the ribbon (selected options become highlighted in Orange).
Note: In selecting Privacy this will hide all Patient Identifiable Data from the Clinic Session.
Examples below: Left screen shot shows the Privacy off, Right screen shot shows the Privacy on.
Ribbon - View Options
Note: Default view is Day View/All Day. Week View and AM/PM Only View can also be selected from the ribbon. Show Holidays will show Clinicians that are on leave. Realloc.List is a place where Patients are stored when an entire Clinic has been cancelled. Patients are allocated to a list, ready to be re-allocated to another alternative appointment.
Patient Appointments
28. To locate a Patient’s appointment history, click on Patient Appointments icon on the ribbon.
29. Find the required Patient from the Patient Find screen and click OK.
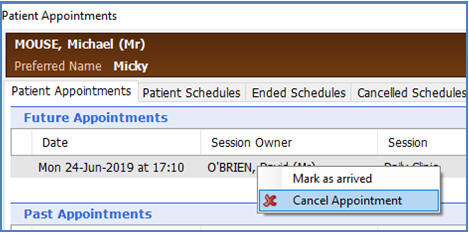
Note: The Patient’s Future, Past, Cancelled appointments will be in view as well as any Patient Warnings.
30. Right click on the Future Appointment if the Patient wishes to cancel and select Cancel Appointment:
31. If required select/enter a Reason, then select Cancel Appointment and click Close.
Book Appointment (using Find Slot)
32. Find Slot on the ribbon enables the quickest way to find the earliest available appointment. Click on the top section (on the looking glass) to open the Find appointments screen.
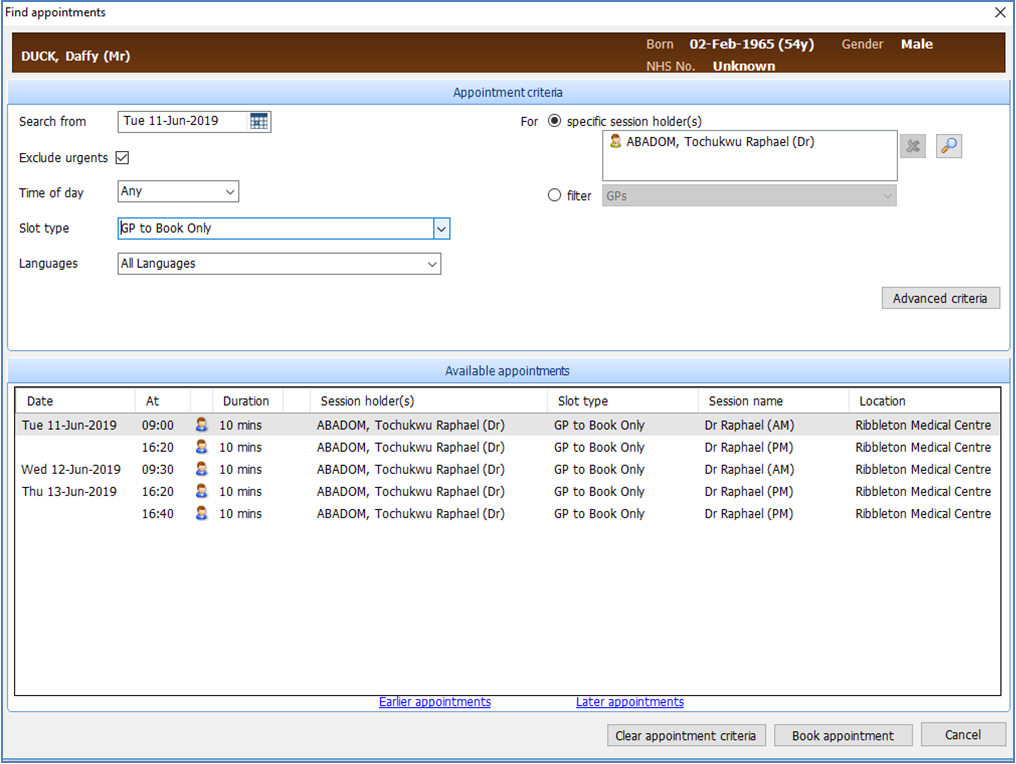
33. From the Find appointments screen, the date will default to look at available slots from today onwards. Alternative future dates can be chosen from the calendar if required. Ensure to place a tick in the Exclude urgents tick box if an urgent appointment is not required. Select an appropriate Time of day.
34. Select the relevant Slot type from the drop-down field: The above screen shot shows a Slot type selection of GP to Book Only.
35. All relevant Slot types will be listed below against the relevant Clinicians. To select a specific Clinician, click on the radio button at the top of the screen next to For specific session holder(s). Click the Browse icon (looking glass) and enter the name of the required Clinician and double click to select the Clinician and click OK. Only Slot types for the named Clinician will be revealed. Alternatively use the Filter radio button and select the appropriate Session Holder Filter.
36. Earlier appointments and Later appointments (hyperlinks) can be selected to search for further suitable dates.
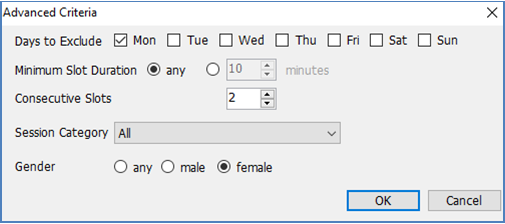
37. Click Advanced Criteria button to search for:
- Days to Exclude for the Patient i.e. the Patient can't attend on a Monday etc.
- Consecutive Slots i.e. when two consecutive 10 minutes slots are required (i.e. 20 mins for a Smear), three consecutive slots for 30 mins etc.
- Gender: Select a Clinician’s Gender
38. Click OK. Highlight the chosen appointment slot and remember to confirm the appointment details. Then click Book Appointment.
39. Complete the booking details as previously shown at point 15.
Right-Click Actions
40. Book unregistered patient allows a slot to be taken up by free texting an unregistered Patient’s name.
41. Slot actions allows a slot to be split (the time halved), added or deleted.
42. Slot properties are shown on the screen shot above, where the Slot type can be changed, blocked etc. Notes can be amended but a Timed reason cannot be altered!!!
43. Slot history shows the changes made to a Slot and by whom.
44. Squeeze in (not visible on screen shot below) enables multiple Patents to be squeezed into a slot. For example a 10 minute Slot can be split into two 5 minute Slots for 2 Patients. This action does not change the Clinic session duration.