
MS OneDrive - Review permissions (ML staff)
It is important that you review your OneDrive files regularly (suggested every quarter) to ensure the permissions on the files you have previously shared are still valid.
The training team are here to support the process of how to review, your OneDrive and how to review and revoke permissions you have issued to data within it. Information Governance support (including records management) is provided by the Information Governance team. Therefore, you may find references to additional Information Governance guidance and support throughout this document.
We all need to play a part in keeping our organisational data safe.
When regularly reviewing your OneDrive there are several points to consider:
- What should you store on your OneDrive?
- If you have corporate data on your OneDrive – where does it need moving to?
- Who have you provided access to?
- What is the minimum retention period for the records in your OneDrive?
OneDrive
Only data that is personal to you should be stored on your OneDrive including but not limited to the following examples:
- Annual Leave/Flexi Leave
- Expenses
- 121 & appraisals
- Change forms – i.e. base location change.
- Motor vehicle documents – i.e. scanned MOT, insurance policy
- Your employment contract
- Occupational health referral information
- Exam certificates
Corporate data
If you have any corporate data stored on your OneDrive for example a draft report, this should actually be stored within your department’s designated SharePoint site (appropriate security restrictions applied where required) to ensure all relevant colleagues have access where required.
If you are a manager
If you have information regarding a team member on your OneDrive, such as performance review or occupational health information, this should be stored on the appropriate SharePoint site with relevant permissions applied ensuring only staff with a legitimate right of access are included.
Please refer to the managers page on Nugget for details regarding what data should be in the employees personal folder.
How to undertake your OneDrive review
Open OneDrive online
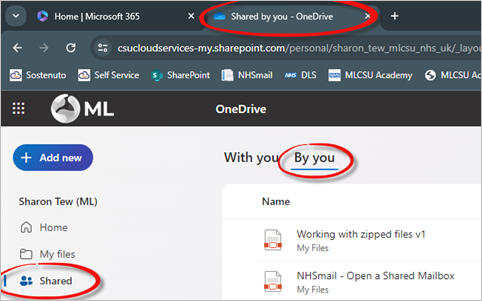
Open the website www.microsoft365.com, you may be prompted to sign in with your email address and password. Click the App Launcher button in the top left corner of the window and select the OneDrive application. The screenshot below is displaying the ML logo as we have signed in with a Midlands and Lancashire email account.

A new tab will be opened at the top of the web browser window. Select Shared from the navigation pane on the left and click By you on the right of the window.
Review permissions
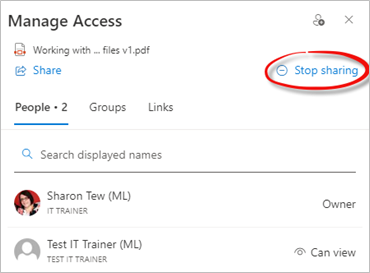
Review all documents shared by you. Select a file to manage the access. Click the 3 dots to the right of the file name and select Manage access from the actions list.
When you review the sharing permissions that you have set to the data on your OneDrive, it is important to consider who you are sharing information with
Additionally, you need to be considering what data is stored upon your OneDrive. Any corporate data should be stored in the correct location where your team can access in your absence, with the correct permissions attached to ensure we are protecting data at all times.

The Manage Access box will be displayed. The people you are sharing the file with will be displayed in the People section including the sharing permissions you have set. For this example in the screenshot Test IT Trainer can view the file.

Remove permissions for all
Select a file to manage the access. Click the 3 dots to the right of the file name and select Manage access from the actions list.
Click Stop Sharing in the top right corner to remove all permissions for the file for everyone in the People
A confirmation message will be displayed. Click Stop sharing.

All the people will be removed except yourself as an owner.

Remove permissions for an individual
Select a file to manage the access. Click the 3 dots to the right of the file name and select Manage access from the actions list.
The Manage Access box will be displayed. The people you are sharing the file with will be displayed in the People section including the sharing permissions you have set. For this example, in the screenshot Test IT Trainer can view the file.
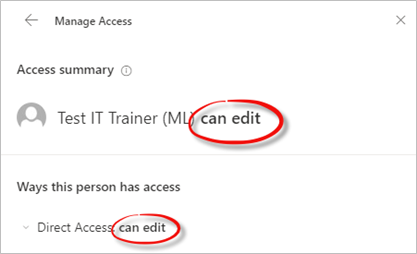
Click the person’s name, the Access summary details will be displayed. The person can have Direct Access or access via a link.
To remove the Direct Access, click the arrow to the left of the text Direct Access text and click the arrow to the right of the current access box. For this example the access is set to Can view.
You may give someone access to one personal document for a short period of time, it’s imperative that this short sharing is well managed, and access is revoked as soon as it is no longer required.
Select Remove direct access.

A message will be displayed confirming you want to remove the direct access. Click Remove to confirm.

Access for that user will be removed.
To remove access for people with a link, click the arrow next to the text Specific people with this link. Click the arrow to the left of the profile picture to view the people.

Click the X next to the person to remove their access.

A confirmation message will be displayed. Click Remove to confirm.

All the people will be removed except yourself as an owner.
Amend permissions with direct access
The individual permissions will be displayed next to each person in the People section. In this example Test IT Trainer can view the file.
To amend the permissions, click the person to view the access summary.

The Access summary will be displayed. To change the Direct Access, click the arrow to the left of the text Direct Access text and click the arrow to the right of the current access box. For this example the access is set to Can view.

Select one of the options from the list:
- Can edit – make any changes
- Can view – Can’t make changes
- Can’t download – can view, but not download
For this example we are going to select Can edit from the list. Click Apply to confirm the change.

The permissions will change in the Access summary to can edit next to the person’s name and next to the text Direct access.
To close the Manage access box, click the X in the top right corner.
Amend permissions with link access
The individual permissions will be displayed next to each person in the People section. In this example Test IT Trainer can view the file.
To amend the permissions, click the person to view the access summary.
The Access summary will be displayed. To change the link access, click the arrow to the left of the text Specific people with this link. For this example the access is set to Can view.#
Click the More options button (cog).

Under the Settings section, click the arrow next to Can view which is the current setting for this example.

Select one of the options from the list:
- Can edit – make any changes
- Can view – Can’t make changes
- Can’t download – can view, but not download
For this example we are going to select Can edit from the list.
Click Apply to confirm the change.

A confirmation message will be displayed, change the link setting? Click Change.

The permissions will change in the Access summary to can edit next to the person’s name and next to the text Specific people with this link.

To close the Manage access box, click the X in the top right corner
Further Information Governance guidance and support is available from:
- The Information Governance Hub: ig@nhs.net
- The Information Governance page within Nugget also contains additional information, training and links to policies.
- Information Governance handbook IG Handbook.
- IG & Data security Policy
Additional Guidance
Please refer to the User & Video Guides or the Microsoft 365 page for on the MLCSU Academy for additional guidance.
Please contact the MLCSU IT Training Team if you need any further help. Email: mlcsu.academy@nhs.net