
EMIS Web - Getting ready for Prospective Patient Record Access
In preparation for practices getting ready for prospective record access being automatically enabled by EMIS on 30 November 2022, for those patients who have online access to patient facing services, it is important that practices are fully aware of what access is already being granted to existing patients. A pre-requisite for practices enabling patients' access to their own records online is to ensure the control parameters are correctly enabled from within Patient Facing Services in EMAS Manager. This tool ultimately controls currently what can be retrospectively accessed for existing patients, practice wide from any Service Provider i.e. NHS App, Patient Access, MyGP etc. for access to Appointment bookings, Medication Requests and Record Access.
Practice Settings: EMAS Manager
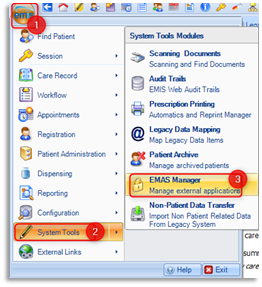
To view settings click on the emis ball and select System Tools, then select EMAS Manager.
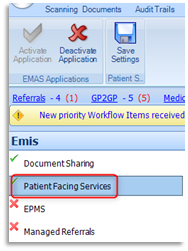
From the left hand pane select Patient Facing Services.
Scroll down to the Record Access section of Patient Facing Services to ensure the settings are correct.
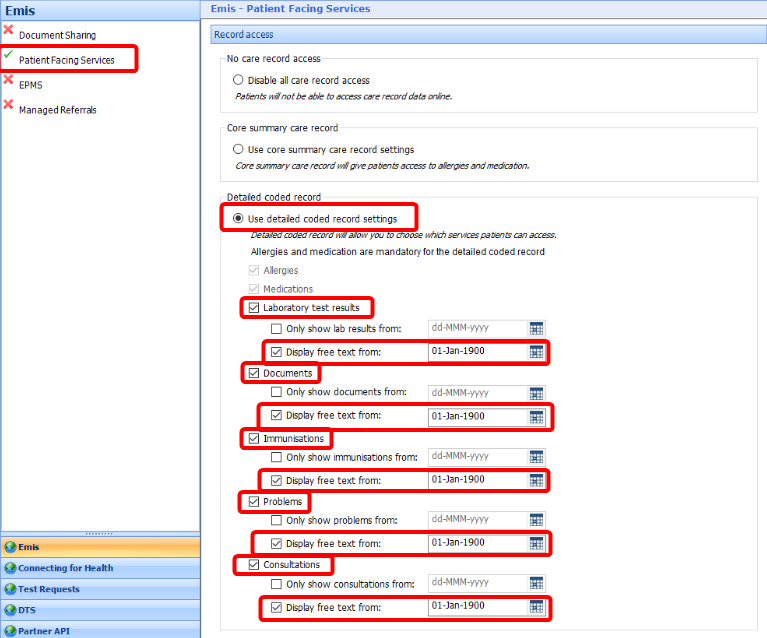
Since 31 March 2016 general practice has been obligated to offer their patients access to detailed coded information held in their medical record. Practices were to enable Detailed coded record for their patients by selecting Use detailed coded record settings radio button as shown above.
Practices were no longer able to opt for No care record access or Core summary care record as previously permitted. Detailed coded record automatically includes two mandatory Services: Allergies and Medication (Core Summary) by default.
Since 2019 general practice has been obliged to offer patients full online access to their future, or prospective, GP health record unless exceptional circumstances apply. The incremental changes to what patients can now access online is Detailed coded record including all coded consultations and free text entries plus documents and test results.
To enable access to each service, place a tick in the box beside all the above services: Laboratory test results, Documents, Immunisations, Problems, Consultations.
The Display free text from: option, if ticked, enables a date to be entered when the free text (comments) associated to that entry can be displayed from. If unticked no free text entries will be displayed.
Only show lab results / documents/ immunisations / problems / consultations from: option, if ticked, enables a date to be entered when these entries can be displayed from. If unticked all entries will be displayed.

If a practice chose to restrict documents/consultations from being displayed up until a certain date, adding a date entry would ensure that all patients would not see documentation/consultations prior to the specified date. The above example shows that consultations and free text will only be displayed from 01 April 2022. This action will relate to all patients, practice wide. The date of 01 Apr 2022 is used for demonstration purposes only.
Workflow Manager
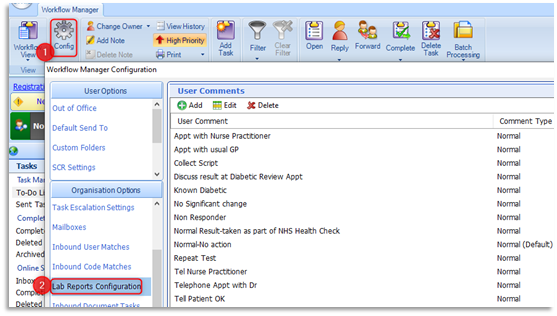
It has been recommended since 31 March 2016 that practices should select 'Display free text from:' for Investigations. This action will enable patients to be able to view their test results accompanied with the clinicians' guidance/action/advice, which is ultimately the free text. Please do consider the User Comments that are currently being recorded within your Lab Reports Configuration within Workflow Manager to ensure their appropriateness. The comments and their clarity are twofold in suitably informing both your administrative staff and patients accessing online.
If the Display free text from: option is unticked this will reveal the lab result accompanied with the word 'Abnormal' or 'Normal', which is acceptable for the latter circumstance. However, if the result is accompanied with 'Abnormal', this alone can be more worrying for the patient. Having the ability to see the clinicians' free text could significantly reduce telephone calls to the practice.
Patient Online user settings: Registrations
When a patient requests access to patient facing services, access has to be enabled within the individual patient's Registration details. This may be a new patient to the practice or an existing patient requesting access for the first time.
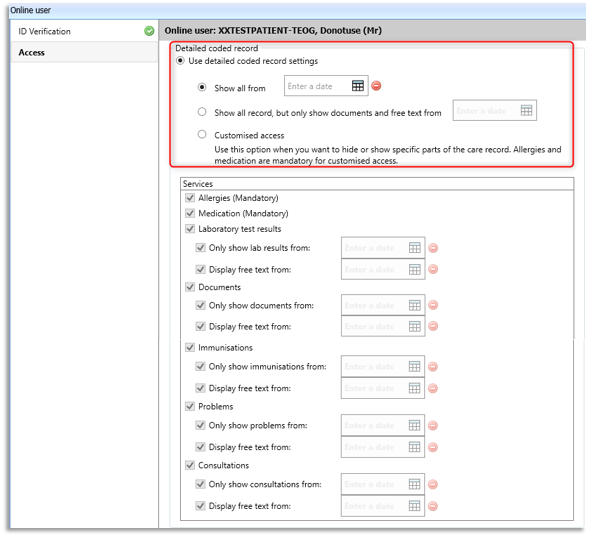
The Record Access and the Detailed coded record section is identical in content to the one held in EMAS Manager. However, in this instance, this access relates only to this individual patient. Please note that any dates placed within these fields will not precede those recorded in EMAS Manager. New enhancements have also been made to the date settings: Show all from: option, if selected the specified date will pre-populate the date for all care record entries, including free text. Show all record, but only show documents and free text from option, if selected will show all the record, but will restrict documents and free text to display from a specified date. Customised access option, if selected enables specific parts of the care record to be displayed/restricted.
For new patients access to the record should be enabled from the date permission was granted. For example if permission was granted today, today's date would be entered in all the above Services' date fields. Please note patients will not have access to view administrative tasks or communications between practice staff. However, patients will be able to view appointment 'Reasons' from their appointment history, and it is therefore encouraged to keep these reasons clinical/appropriate.
GP2GP Transfers
(Patients moving practice with notes transmitted electronically between practices)
Currently, when a patient moves to a new practice, any online visibility restrictions which have been added by the previous practice are not transferred to the new practice. This means the new practice must manually review the patient record and decide if they want to add any online visibility restrictions. As the Data Controller, the receiving practice is responsible for the data being shared and it is recommended that the practice takes the time to check any patient record once filed to ensure they are happy with the visibility status of all care record items.
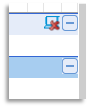
New EMIS Web functionality with Release 9.24.1 will mean any online visibility restrictions in a patients care record will now transfer to their new practice via GP2GP. Any items that have online visibility restrictions will have the online visibility icon against them:
Please note: when a patient who has online access transfers to a new practice, they will no longer have online access to their record from the date prior to their move. Patients will only have prospective record access from the registration date at their new practice. New changes to prospective access mean that the patient has the right to be granted access from the date of registration acceptance (not the date they requested online access).
Examples:
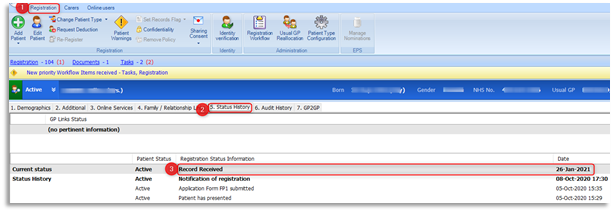
If a patient registers at a practice on 01 April 2023 and requests access on 01 July 2023, online access will be granted from 01 April 2023. It is anticipated that the automated process will take its information from Records Received date within the patient's Registration Status History.
If a patient registers on 14th April 2023 requesting prospective record access immediately, this will only be from the date of registration (i.e. will not be backdated to 1st November 2022).
Prospective full access to online care records will be available automatically for anyone who has access to a patient facing services App such as the NHS App or any other App which allows record access following the switch on date. Any existing patients with historic (retrospective) access will remain the same but with the addition of future access.
The following section of the support guide will advise practice staff on how to redact information and what areas of the system it can be redacted from. Please consider all areas of the system where information will be added to a patient's care record that may need redacting in the interest of patient safety:
- Consultations (including coding & documents)
- Medication/Problems/Investigations/Care History/Documents/Referrals
- Workflow Manager (Inbound Lab Results/Documents)
- Document Scanning
Redact a Consultation
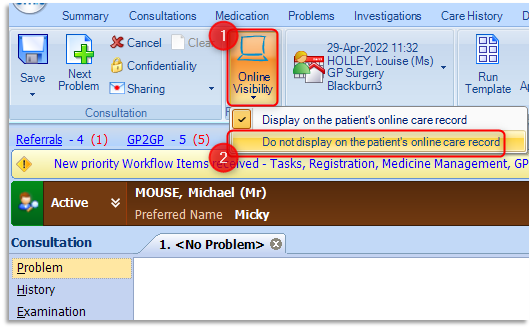
At the time of publishing this guide Consultations was only one of the two original places where Online Visibility could be applied. Once a consultation has been created and opened, the consulter will make the necessary judgement to redact the consultation from online view. Consultations are visible online by default. To redact the consultation in full from online view, select Online Visibility on the ribbon and select Do not display on the patient's online care record.
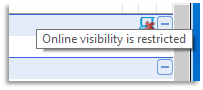
This consultation will not be visible to the patient online and will display the following status icon to the right of the record entry for the practice's information.
When the cursor is placed over the status icon, it reveals to the user that it is a hidden online entry for the patient: 'Online visibility is restricted'.
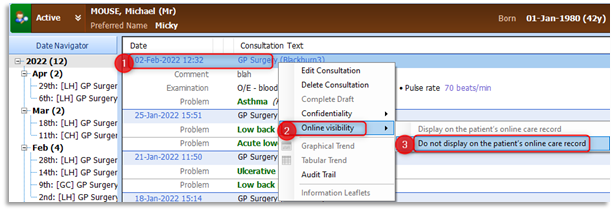
Retrospectively Redact a Consultation
There will be many situations when historical data will have to be hidden from online access. In order to hide retrospective data, right click on the selected consultation entry and select Online Visibility, then select Do not display on the patient's online care record.
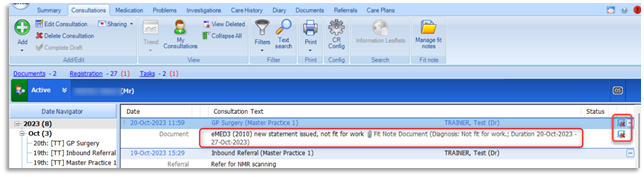
Fit Note Update
The Online visibility status of fit notes will no longer have to be set manually in Care History or Documents, as the example shows how to manually apply above. When adding a fit note, it will now inherit the Online visibility status of the consultation that it has been generated within.
Redact Medication
From Emis Web v9.18.8, it will be possible to select any medication item and 'hide from online visibility'.
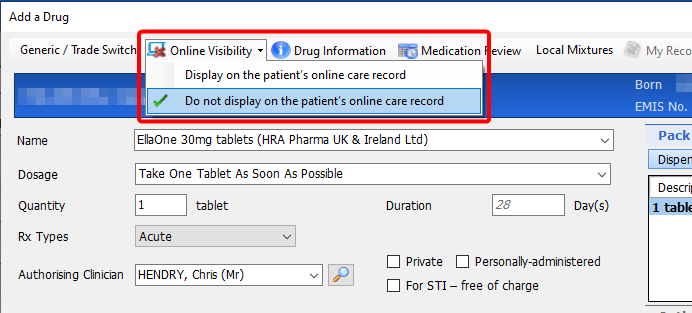
At the point of adding/issuing medication items
Prior to confirming the issue of the medication, select Online Visibility and then select Do not display on the patient's online care record.
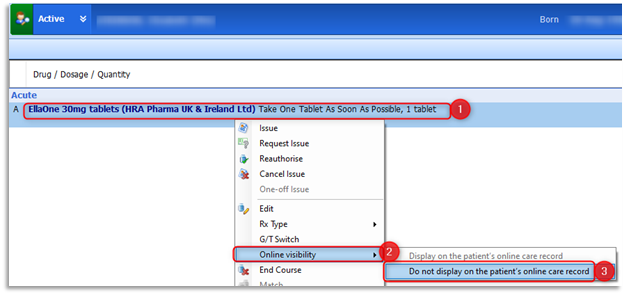
After issuing medication
Right click on the item to be 'hidden', then select Online Visibility then select Do not display on the patient's online care record.
The online visibility status of medication items can be seen from the 'Current Drugs' view in the far right-hand column:

Adding medication to a consultation
During an open consultation it is recommended that online visibility is hidden prior to adding the medication, as the medication is immediately visible, even before the consultation is saved. To prevent a medication being visible online at any time:
- Set the consultation to 'hidden' before adding the medication
- Set the medication to 'hidden' in the 'Add a Drug' screen
If the consultation is set to 'hidden' after adding the medication, then the medication that was visible, will then be hidden once the consultation is saved.
With current, past drugs and all courses you can:
- Hide a current medication course on the 'Current Drugs' view
- Hide all past instances of a medication course on the 'Past Drugs' view
- Hide an individual past instance of a medication course on the 'All Courses' view
When adding, editing, replacing and restarting medication you can:
- Hide a new medication course at the point of adding it
- Hide an existing medication course at the point of editing it
- Hide an existing medication course at the point of replacing it
In 'Past Drugs' view, the 'hidden' icon will only be displayed if all past instances of that drug are hidden.
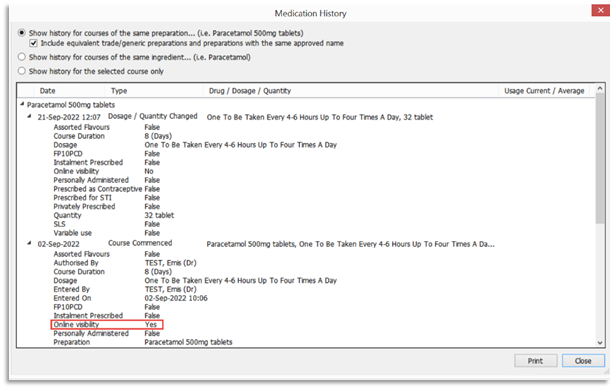
Drug History
The online visibility status can also be viewed from the Drug History:
Redact Problems
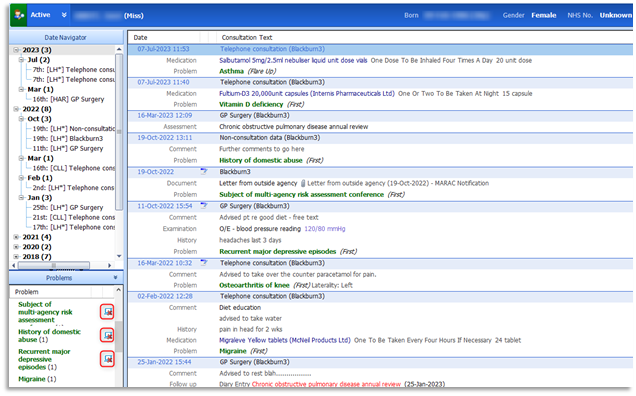
At the time of publishing this guide, any hidden Problems added to a Care Record were not represented with the Online Visibility status icon. This has since been rectified and now any problems that are hidden from online access are clearly labelled from the Problems tab.
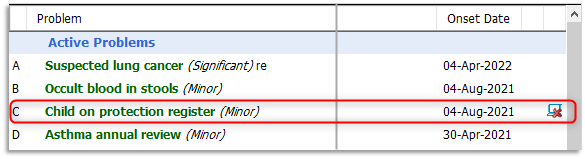
To redact a Problem from patient's Problems tab, right-click on the required Problem, then select Online visibility and do not display on the patient's online care record.
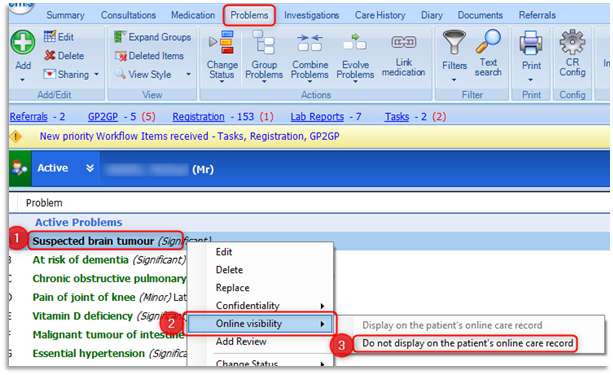
The Online Visibility status icon is now displayed in the Problems Panel from Consultations.
The Online Visibility status icon is now displayed in the Detailed View within the Problems tab for both Combined and Evolved Problems.
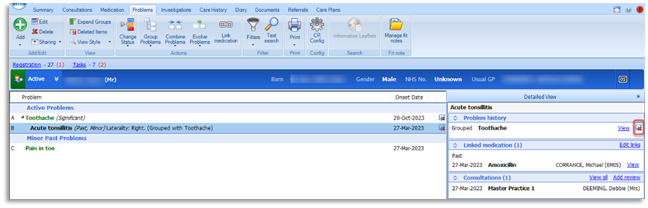
A warning message will appear when Online Visibility is set for combined, evolved or grouped problems. The message displayed will read, 'Changing the online visibility of the selected problem(s) will also change the online visibility of any child problems (grouped/evolved/combined).
Redact a Filed Lab Result
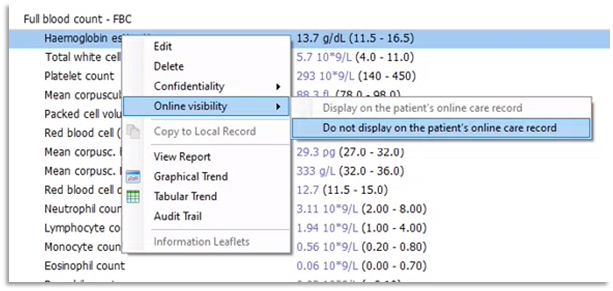
To redact a filed test result, from the patient's investigations screen, right-click on the required result, then select Online visibility and do not display on the patient's online care record.
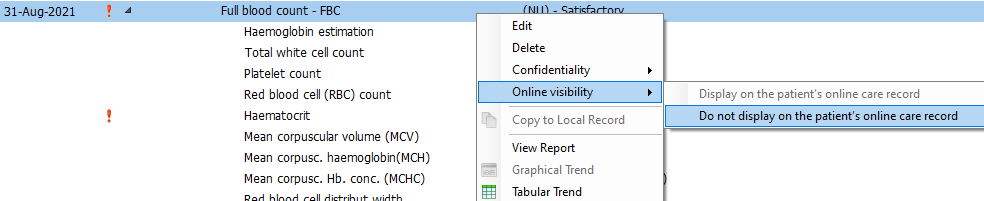
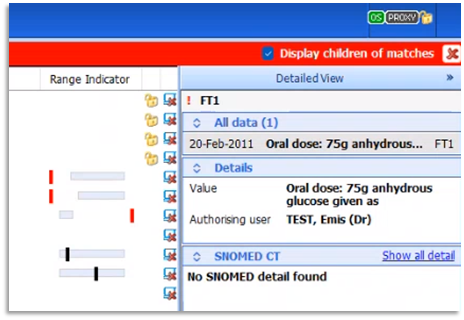
Please note: The Online Visibility status icon is only visible when on Values View and not View Reports view of Investigations. Online Visibility can also be added to 'Child' observations, e.g. Haemoglobin within a Full blood count:
Please note this important update from Emis relating to lab reports:
Lab Report titles showing in Patient Facing Services
Publish Date: 12/06/2024 10:40:00 BST
We are aware that Lab Report titles are still visible to patients under Consultations in PFS, even if each individual Investigation within that report has been marked as ‘Do not display on the patient’s online care record’ in EMIS Web.
This means that users may be aware that a report has been received by the practice even if they cannot see the results within the report.
However, some report titles have been found to include the actual test result. This means the patient may see the test results before they have been contacted by a Clinician to discuss it.
Action by EMIS:
- We are working on a change to stop the Lab Report title from showing in PFS in all circumstances, regardless of the Online Visibility setting that has been applied to the Investigations
- This work is being done under PRB0051889 and provisionally scheduled for EMIS Web 9.25.4.
Action for Users:
-
Whilst this work is being undertaken, users can ensure that the Lab Report title is hidden on PFS by marking the whole Consultation as ‘Do not display on the patient’s online care record’ via Online Visibility.
Redact Care History
At the time of publishing this guide Care History was one of only two original places where Online Visibility could be applied. Right-click on the required item, then select Online visibility and do not display on the patient's online care record.

The procedure can be reversed by right-clicking the required entry, select Online Visibility, then select Display on the patient's online care record.
Redact Documents
The option to apply Online Visibility now appears in the Documents tab. Right-click on the required document, then select Online visibility and do not display on the patient's online care record.
Key points when adding documents:
- Display/Do not display newly attached documents/created letters via a consultation with the Online visibility feature
- Enables the document to inherit the Online Visibility status of a consultation. Therefore if the Online Visibility is changed before creating the document, when the document is created it has whatever has been set as the Online Visibility status
- Documents and letters can be hidden using Online Visibility and the consultation can still remain visible
- Document/letter Online Visibility can be edited at anytime
Docman Practices Only:
Update 15/03/2024 - Please read the update from Advanced regarding Docman's inability to share patient documents even after they've been reviewed in Docman here
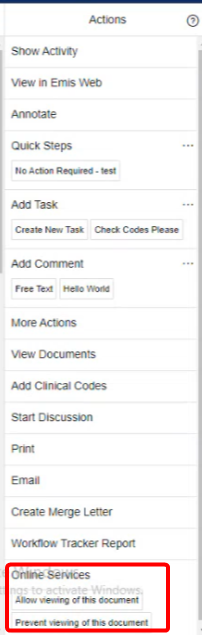
Update 22/03/2024 - Advanced Software have also assured us that they are aware of and are looking to implement a fix for the issue of the 'Patient Visibility' options currently residing at the bottom of the Actions section, increasing the likelihood of it being missed by the member of practice staff dealing with the document. Until this is fixed, please be aware that you may have to scroll down the actions section - using the actions section own scroll bar - in order to see / change these patient visibility options (see image left).
Redact Referrals
The option to apply Online Visibility now appears in the Referrals tab. Right-click on the required referral, then select Online visibility and do not display on the patient's online care record.

Warning: Referral Forms
Prospective record access presents a significant risk of exposing more historical data than originally intended (i.e. pre-01/11/2022) through the use of referral forms (both Emis Web document templates and eRS forms).
This is because, historically, the inclusion of 'past medical history' as a section was informative for clinician colleagues working at the referral target organisation. However, unless marked as 'not visible', such sections will be visible in the referral form sent from the GP practice.
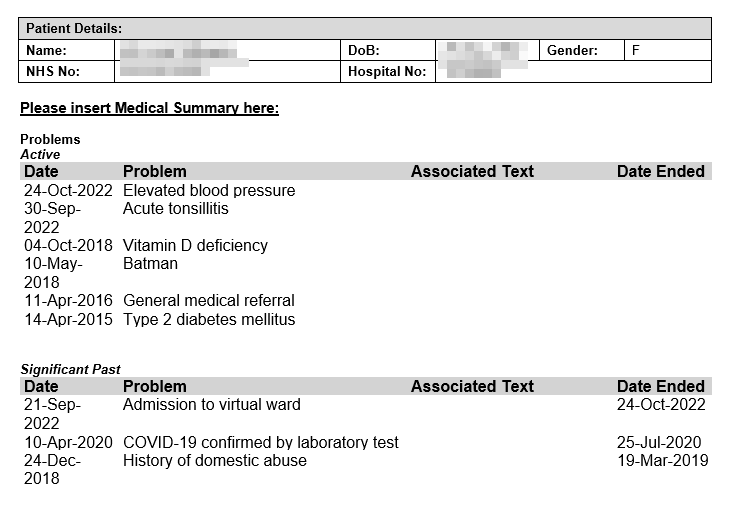
We would recommend that either the referral forms are amended to 'prompt' or to hide the entire document / consultation from online visibility (especially if the historical entry is relevant to the referral).
Referral forms can be amended to 'prompt to choose items...' for the sections relating to Problems, Medications and Allergies when editing the document in Template Manager / Resource Publisher.
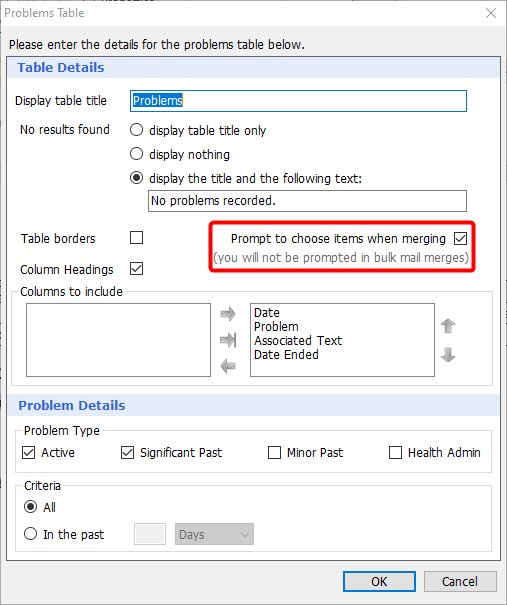
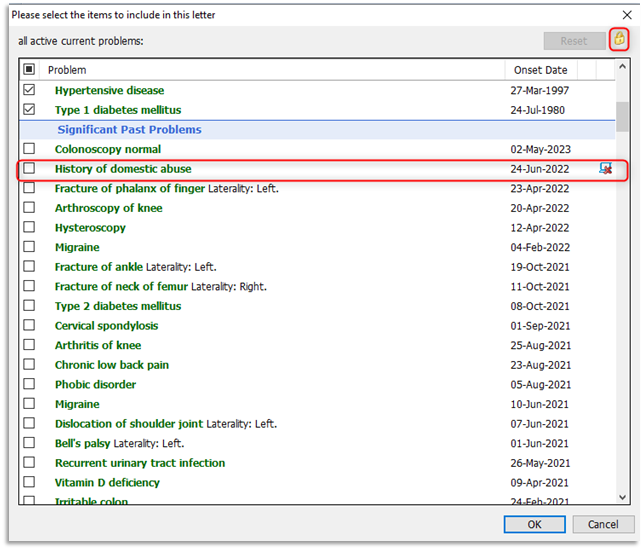
Please note: At the time of publishing this guide, only a 'confidentiality policy' padlock appeared and the online visibility icon did not appear when choosing what to include / exclude within a referral form. The latest functionality now includes the online visibility icon for Problems and Allergies but not Medication. Please ensure that sensitive / hidden entries are not selected for inclusion.
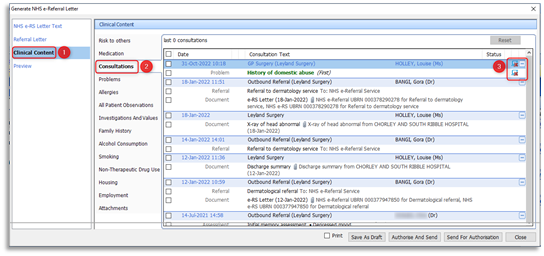
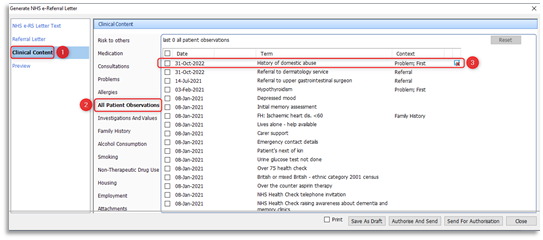
Please note that when generating an NHS e-Referral letter, the Clinical Content section must be carefully checked to ensure that sensitive hidden data is redacted prior to authorising and sending the referral through to eRS. Consultations will clearly identify the hidden from online visibility entries (denoted by the icon). Do not select / tick these entries for inclusion:
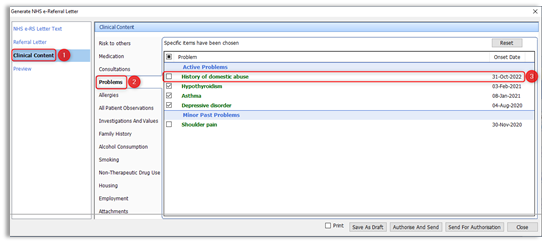
Active Problems are selected / ticked by default. Please ensure that sensitive / hidden entries are not selected for inclusion. Please deselect / untick any hidden, sensitive entries:
In All Patient Observations the 'hidden from online visibility' icon is clearly visible for exclusion:
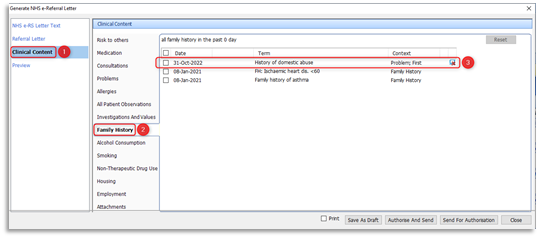
In Family History the 'hidden from online visibility' icon is clearly visible for exclusion:
Originally emis web had only two places within the care record where online visibility could be hidden from: These were Consultations and Care History. Now there are only two places where online visibility can't be hidden from, these are Summary and Diary.
Care Record Filters
There is a new option to filter by Online Visibility in the Consultations, Problems, Investigations, Care History, Documents and Referrals screens in Care Record.
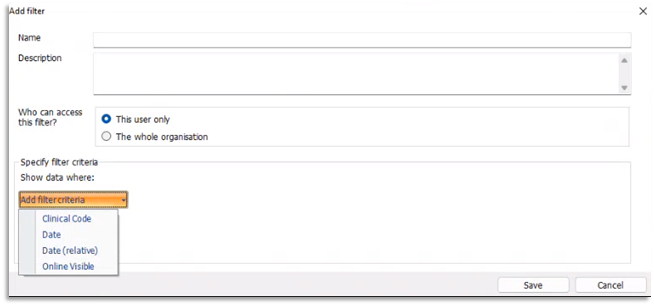
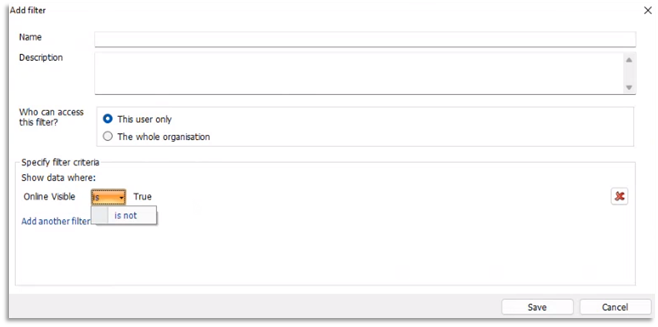
The filter will need to be configured to 'Online Visible is not True' to display information that has been hidden from the online record.
When the the Online Visibility filter is applied to a screen, a red bar is displayed at the top of the screen to clearly indicate that the screen is being filtered.
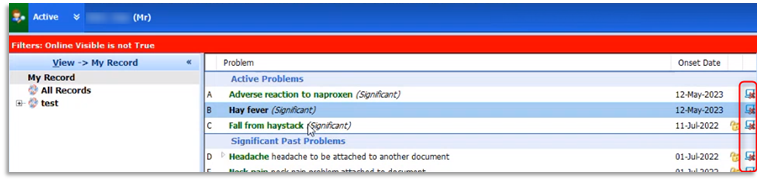
If the 'Display children of matches' option is ticked in the red bar, the child results of the matches will be displayed whether they meet the the criteria of the filter or not.
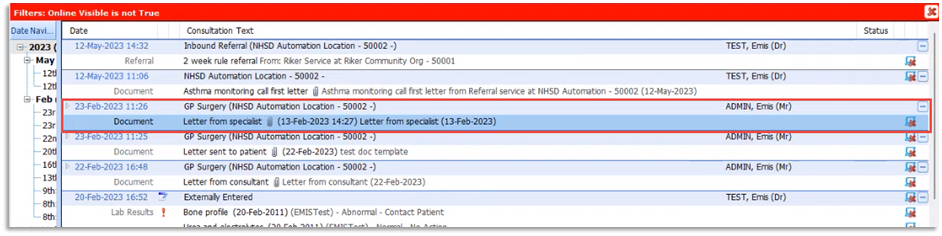
If a patient has a consultation that is visible online, but it contains a document that is hidden, when filtering by 'Online Visible is not True', the consultation will be returned as it contains data that is hidden.
Redact an Inbound Lab Result in Workflow Manager
Patients will only be able to see their lab results once they have been processed and filed by the practice. Whilst Lab Results remain provisional (unfiled) in Workflow Manager they remain hidden from online view. Is it only when items have been filed that they are immediately visible to patients online.
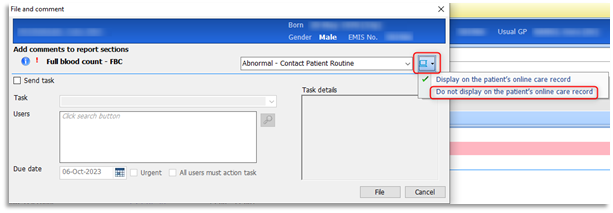
Within a Clinician's Lab Reports Inbox, highlight the lab report and always select File and Comment. Online Visibility can only be added via the File and Comment option. It is not available when using the File no Comment option. The online visibility icon is represented by a computer with a drop-down arrow beside the Comment field.

Select the drop-down arrow and select Do not display on the patient's online care record.
Redact Documents in Workflow Manager
(Non-Docman practices only)
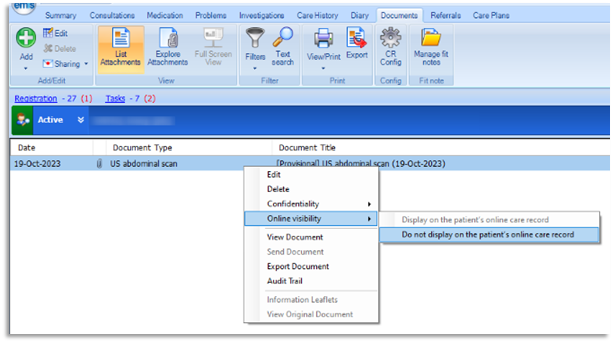
Patients will only be able to see incoming workflow documents from online access once they have been processed and filed by the practice. Whilst documents remain provisional (unfiled) in Workflow Manager and the care record, they remain hidden from online view. The following screen shot represents a [Provisional] labelled document within the patient's care record: Hidden from Online Visibility)

Is it only when documents have been filed/completed (no longer provisional) that they are immediately visible to patients online. Previously, it wasn't possible to hide a document from online access within Documents section of Workflow Manager. However a recent addition to functionality now makes it possible when the document is accessed/opened.
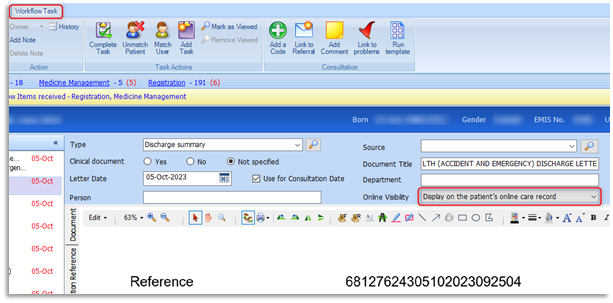
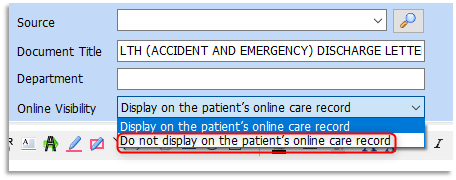
An Online Visibility drop-down field exists for all documents and default's to Display on the patient's online care record. To hide a document from online access, click on the drop-down arrow beside Online Visibility and select Do not display on the patient's online care record. Continue to workflow the document as per usual process.
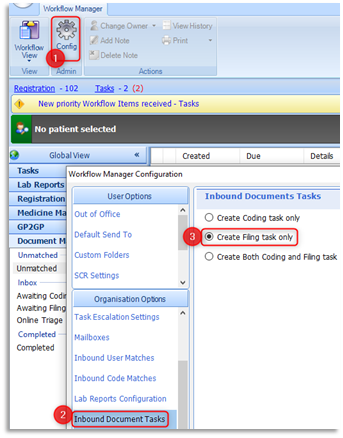
All staff including workflow administrators and clinicians should know how to hide sensitive data before filing documents within Workflow Manager. This guide has been produced to support all practice processes, as they will differ. For example, practices in the Greater Preston and Chorley & South Ribble localities have configured their Inbound Document Tasks (Target Inbox) to Create Filing task only.
Please be aware of the three options that are available to practices to receive incoming documents to suit document management processes:
- Coding Inbox option - keeps documents in the 'Awaiting Coding' Inbox only (by changing owner from one recipient's Coding Inbox to another)
- Filing Inbox option - enables a task to be work-flowed into a recipient's 'Awaiting Coding' Inbox
- Create Both Coding and Filing task option - the task is duplicated in both the 'Awaiting Coding'/ 'Awaiting Filing' Inbox to be processed
The Filing option was preferred for the two localities as it enables practice staff to separate the incoming filing: Awaiting Filing Inbox by work-flowing to other recipients' Awaiting Coding Inbox. Only workflow administrators manage the Awaiting Filing Inbox, enabling clinicians/pharmacists/medicines management etc. to focus on their separate Awaiting Coding Inboxes.

Awaiting Filing Scenario: Workflow administrators will open the document as shown above and if further action is required will tick the Create (Workflow tasks:) tick box, set urgency as required and assign to an individual or team.

Important Warning when completing a Filing Task
To remove the document from the Awaiting Filing inbox, the task must then be completed. Workflow administrators will then select Complete Task. The task is then removed from the Awaiting Filing Inbox but remains in the Awaiting Coding Inbox of the newly assigned recipient. Please be aware that with this process the [Provisional] flag has now been removed from the document in the care record although it remains in the Awaiting Coding Inbox! It is now visible to the patient online whilst remaining in Workflow Manager!
The workflow administrator will also select Complete Task if no further action is required with an inbound document and therefore immediately file it within the care record. As there is more than one way to process documents, it is important to identify the safest route and that the first person to encounter the document in the Awaiting Filing Inbox should be the one to hide it before work-flowing to other recipients, especially if the task is going to be completed and remain un-provisional in Awaiting Coding. This is a recommendation to minimise risk!
Whichever Inbound Document Task option used, whether it be to select 'Complete Task' or change 'Owner' of the Document, please be aware of need to hide the document before the journey of the task is completed.
Docman practices only
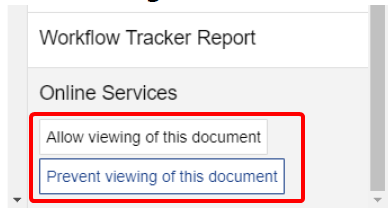
The patient / online visibility of a document can be set from the bottom of the 'Actions' bar (right-hand side of the Docman screen) by choosing 'Prevent viewing of this document'
Please note: if the visibility is set to 'allow viewing of this document', any Docman redactions (or comments / annotations) will not be visible by the patient online. i.e. The full, unedited, unredacted version of the document will be viewable.
Redact a Scanned/Attached Document
The option to apply Online Visibility now appears when scanning or attaching a document.
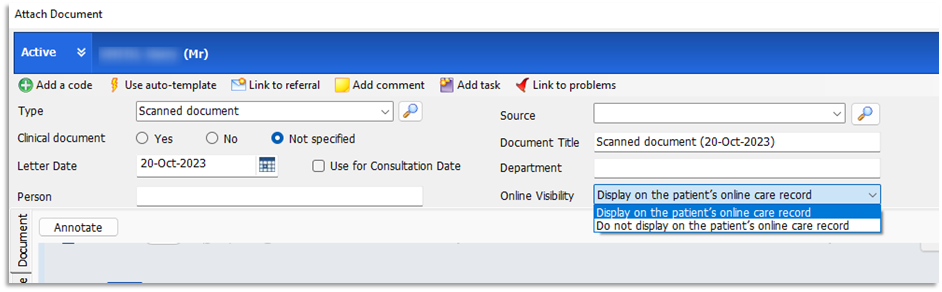
It is important for those staff responsible for scanning documents to know how to hide a document when using either of the two available options during scanning:
- When the document doesn't need to be work-flowed and sent to a recipient, the scanner is responsible for clicking File, to immediately file within the patient's care record
- When further action is required the document will be work-flowed to the appropriate recipient by ticking the Create task option, selecting a suitable recipient and then clicking Send

Prior to either of the two circumstances, remember to hide a document in the same way as described within Workflow Manager. Click on the drop-down arrow beside the Online Visibility field and select Do not display on the patient's online care record. Continue to process the document accordingly.
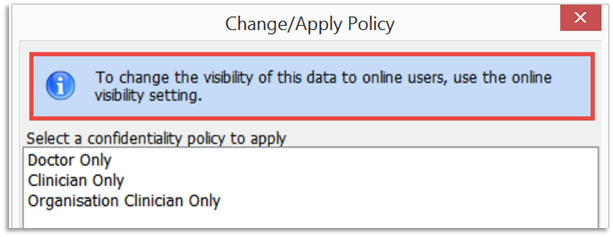
Confidentiality Policies
From version 9.18.8, the Online visibility option will be the only way to stop certain data from being visible online. Before 9.18.8, a confidentiality policy would also hide the data online. Users will be advised of this when changing or applying confidentiality policies.
All existing confidentiality polices, added prior to 9.18.8, will remain hidden from online view, even if they are edited. To achieve this, emis will change these items' Online Visibility setting to 'Do not display on the patient's online care record':
Precis Bar Online Status
In support of practice awareness the patient's online status is currently available on the Precis bar.
- Patients that have a Live registration will have a Green OS icon
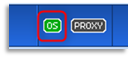
- Patients that have an Active status are yet to register with the service provider and will have an Amber OS icon
- Patients that have No Online Access access will have a Black OS icon
Exclusions
The automatic activation tool will not make any changes for patients or online accounts that fall within the following categories:
- Patients under the age of 16 on activation date
- Proxy account users
- Patients with the SNOMED CT code 1364731000000104 'Enhanced review indicated before granting access to own health record' added to their care record
Emis is currently advising practices of the following preparation:
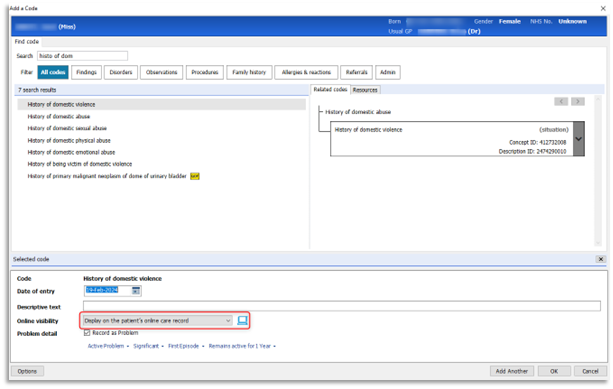
- Identify any patients that should not be given access to their online care record and add the SNOMED CT code 1364731000000104 Enhanced review indicated before granting access to own health record (situation) to their record. This will prevent them from being included when the tool is run
- This code could be added as a problem so that it is easily visible
- If you decide that, following a review, the patient should be given access to their online care record, SNOMED CT code 1364751000000106 Enhanced review not indicated before granting access to own health record (situation) should be added. The tool will then include the patient. If you complete a review after the tool has been run, you will need to configure online access manually for the patient
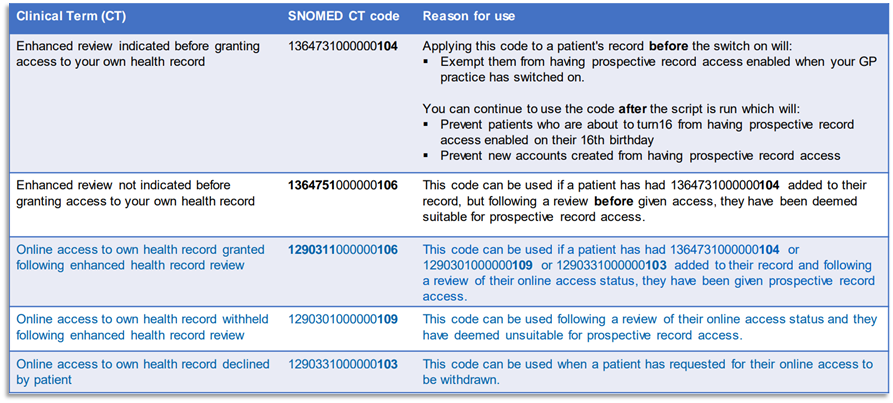
Enhanced Review and Online Access (SNOMED CT) Codes
Please refer to all related codes in the table below:
Raising Concerns / Reporting Incidents
If any of your patients have experienced adverse events as a result of access to their online record, NHS England have set up this form which can be used to report back directly to the team responsible (in addition to reporting the risk in the usual way):
Safeguarding Issues and Risks for Online Record Access - NHS England
Consultation Write-back
If online visibility is restricted at a consulting organisation, it will also be restricted at the patient's registered practice. There is an option for the sending organisation to set the Online Visibility flag to 'Do not display on the patient's online care record', meaning the consultation will not be visible via Online services until the patient's registered practice chooses to enable it.
Contact Us
For all IT Training related issues or support with this document, please contact your practice's designated trainer. If you do not have a designated trainer, or are unsure, you can email the IT Training Team: mlcsu.academy@nhs.net
For Data Quality issues, please contact the Data Quality Team via the ML Service Desk using either the Self-Service portal (https://sunrise-saas.com/mlcsu/SContacts/) or AVA chatbot (Livechat). If you have a high priority issue, you can call the Service Desk on 0300 555 0212.